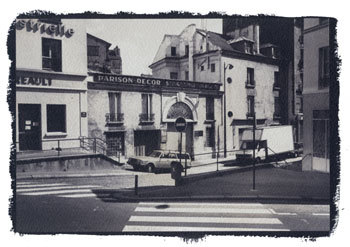
Paris Xe, 1988 Salt Print – Peter Marshall
To coincide with the opening of Salt and Silver: Early Photography 1840 – 1860 at Tate Britain, here is a slightly updated version of a piece I wrote some years ago on salt prints, including step-by-step instructions on making them and four examples of my own efforts from the late 1980s.
Key Facts
- ‘Photogenic drawing’ used ordinary paper which had been given a coating of silver chloride or similar light-sensitive silver salt.
- Prints were made by placing objects on this paper and exposing to light. In the 20th century this way of working was named as a ‘photogram’.
- Photogenic drawing was a printing out process – the image actually appeared during the exposure to light.
- Photogenic drawing can also be used as a method for contact printing from negatives – prints made in this way are known as salted paper prints or salt prints.
- Contact printing requires the negative to be held in close contact with the printing paper, usually in a special printing frame, while being exposed to light through the negative.
- Exposure times in salt printing vary from around 10 minutes to 8 hours depending on the strength of the light source and how transparent (or translucent) the negative material is.
- As with all contact processes, the print is obviously the same size as the negative.
- Talbot fixed his images by using strong salt (sodium chloride) solution, or a weak potassium iodide solution. Neither was totally effective.
- Later, Herschel’s suggestion of hypo (sodium thiosulphate) as fixer was adopted. This was fast and totally effective.
- By repeating the sensitising process several times, Talbot found he could increase the speed of the salted paper sufficiently to use in a camera obscura.
- Typical exposure times in the ‘camera obscura’ were around 30 minutes, with apertures probably around f8 in modern terms.
- The paper negatives were fixed and then often made translucent by treatment with wax or oil before being placed on top of a fresh sheet of sensitised paper and contact printed using sunlight as the light source. Typical printing times would be around 30 minutes to an hour.
- Although rapidly superseded for use in the camera by the Calotype process, the basic salted paper print was the normal process for photographic prints on paper until replaced by the albumen print around 1850.
- After 1855, salted paper remained in use mainly as a proofing medium and by a few who preferred its matte image. It saw a revival in the 1980s and 1990s as a part of a growing interest in historical and alternative processes
Talbot’s method
- Talbot started with a sheet of best quality writing paper ‘with a good firm quality and smooth surface’.
- This was dipped it into a weak solution of common salt and then wiped dry
- The sheet was then coated on one side with a weak solution of silver nitrate (a saturated solution diluted with six to eight times the amount of water) and dried in front of a fire.
The paper was then ready for use for making photogenic drawings or as Talbot more poetically wrote ‘nothing can be more perfect than the images it gives of leaves and flowers, especially with a summer sun : the light passing through the leaves delineates every ramification of their nerves.’
A more modern version of this procedure is still used by those photographers today who wish to make salted paper prints – also known as salt prints – see below for directions.
For use in the camera, the speed of the material needed to be increased. Talbot found he could do this basically by repeating the treatment. He first washed the prepared paper with a saturated solution of salt, and dried it. Tested at this stage it was more or less insensitive to light, but if re-brushed with ‘a liberal quantity of the solution of silver’, it became more sensitive than before.
By repeating the coating several times, it would become fast enough for use in the camera (though his exposures might be 30 minutes.) Talbot obviously found the process rather unpredictable, noting that sometimes the paper would begin to darken without any exposure to light, showing the process had been taken too far.
After each coating with silver, he clipped a small part from each of the sheets he was working with, numbering them carefully to correspond to the sheet, and ‘placed (them) side by side in a very weak diffused light for about a quarter of an hour.’ If one of them darkened considerably, the corresponding sheet was ready to be exposed in the camera obscura. It was a crude but effective system of control for a process where there were too many variables to guarantee success by simply following a given procedure.
Talbot’s results
Looking at Talbot’s early results from the camera – or rather at reproductions of them – it is not surprising that they were generally not regarded highly compared to the splendidly sharp and detailed daguerreotypes. In some cases it is hard to see any image at all, others are more weak splodges than detailed pictures. His first existing negative shows a window made of small panes, and on the back he notes that it was possible to count them all when it was first made. Presumably it was no longer possible when he made the note. The image is certainly not now highly detailed and the shadows in particular are completely empty.
Although the photogenic drawings – made as what we now call ‘photograms’, by placing objects such as leaves and lace on the paper – have considerable elegance and are finely delineated, his early camera attempts can only be seen as suggestions that it might be possible to get the process to work rather than as a successful solution. It was a problem that Talbot was to solve himself in the following years with the Calotype process.
The major problem was of inadequate sensitivity to light. These first photographic materials relied entirely on the printing out of the image, which is slow. In the Calotype, Talbot made use of what became to be called a developer to amplify the effect of the light, bringing out the ‘latent image’ from the apparently unchanged paper. It was this discovery that was really to lead to the domination of the next 160 years of photography by silver based materials.
Another aspect of the problem that Talbot faced was inadequate fixation. After exposure he either washed the paper with a dilute solution of potassium iodide or a strong solution of common salt before ‘wiping off the superfluous moisture, and drying it.’ The potassium iodide solution formed silver iodide that was largely insensitive to light, but too strong a solution would dissolve parts of the image. As he had found in his repeated coating, using a large excess of salt solution produces a very low light sensitivity. However images fixed in these ways still faded in light – and certainly the bright sun needed to expose through the paper negative will have also caused fading of the negative.
When Talbot visited Herschel at Slough on 1 February 1839, he received a solution to the problem. Herschel’s wife, Margaret, noted in a letter to a friend that ‘when something was said about the difficulty of fixing the pictures, Herschel said “Let me have this one for a few minutes” and after a short time he returned and gave the picture to Mr Fox Talbot saying “I think you’ll find that fixed” – this was the beginning of the hyposulphite plan of fixing.’
It was also Herschel who provided a clue – in the shape of gallic acid – that was to be the key to Talbot’s discovery of the latent image and development in the Calotype. There are many of us who have made prints using salted paper and even a handful of photographers currently using the Calotype process – some have used actors to recreate Talbot’s later pictures at Lacock Abbey. The recreation of images in camera obscura using his methods, and making prints from these again following his directions would perhaps be an interesting project. It is the only way any of us can possibly see these kind of images in the same condition as when Talbot made them.
Make your own Salt Prints
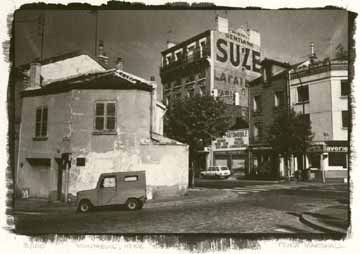
Montreuil, Paris, 1988 © Peter Marshall, 1988.
Gold toned salt print on Georgian Watercolor Paper.
Ordinary writing paper is now factory produced and no longer of suitable quality for any of the alternative processes. Machine made papers generally have shorter fibres and fall to pieces readily when wet, and you need to use a suitable hand or mould-made paper, usually sold for use in watercolour painting.
Silver nitrate needs to be handled with care – you should use gloves and wear safety glasses. When handling any finely ground chemical powder a mask should be worn. Silver nitrate is a poison that can build up in the body and it can both burn and stain skin. It produces stains and marks that are often very difficult to remove from some surfaces.
Like all chemicals, both solid and solutions should be kept in a secure place, locked away from possible reach of children. Silver nitrate solutions are sensitive to light and are normally stored in brown bottles, but it also helps to keep them in a cupboard.
Procedures normally give precise quantities required for solutions measured in grams. However, there is seldom any real need for great accuracy, and many people have made salt prints without using any weighing equipment. Chemicals such as silver nitrate will generally be bought in fairly small quantities and you can make up the full amount into an appropriate solution.
- You can use ordinary table salt or sea salt, making up a solution of roughly 1-2 ounces (25-50g) per litre of water.
Other salts, which some people prefer, include ammonium chloride, potassium citrate, potassium tartrate and potassium bromide. You will often get small differences in image colour and paper speed using the different salts or mixtures of them.
- The silver nitrate solution is generally around 10-12% by weight – so you can dissolve 7g (1/4 oz) in around 60ml of water.
I’ve used a range of watercolour papers, including Waterford Hot Pressed which was possibly my favourite, along with Rowney’s Georgian. Some other papers give better results if coated with a dilute gelatin solution and left to dry before use – this is called ‘sizing’ – but Waterford works well without. Most watercolour papers are already sized when you buy them, and extra sizing is often not needed. You will get good results with most papers.
You also need a brush to coat the paper with – a wide, thin brush is best. Japanese hake brushes which do not have metal ferrules are probably the best, as the silver solution corrodes metal.
Salt printing is a contact printing process and you need a negative the same size as your print is to be. Unless you have a large format camera you may like to follow Talbot’s examples and start work with photograms, using materials such as leaves or lace etc. If you do have a large format camera, take a picture specially and try doubling your normal development time as you need a much higher maximum density than normal for salt prints. You can also work by printing large negatives with an inkjet printer, preferably on to acetate film designed for inkjet use. Prints on paper do work – better on thin paper – but exposure times are much longer. You can also work with negative prints made on photographic paper.
Talbot used the sun for his exposures, which meant the times he could work in England were limited. Unless you are blessed with a sunnier climate you may want to find another light source. You need something which is strong in ultraviolet, such as a tanning bed – or you can buy or make special light sources using mercury lamps or UV fluorescent tubes similar to those in sunbeds.
A printing frame is needed to hold the negative in contact with the paper. You can buy or make these, but a sheet of plate glass and a card or ply backing board with some rubber bands round will do (for large prints the weight of the glass is enough to ensure contact.) These were once cheap photo accessories, and small sizes (such as 5″x4″) can still be found cheap in junk shops. I had a good look at an expensive hand-made version, particularly the price-tag, took out a pencil and designed my own, which took about an hour to make. Precision freaks will want a vacuum frame!
St Denis, 1988, © Peter Marshall, 1988. Gold toned salted paper print.
Step by Step Instructions
Making a salt print
- Tear or cut the sheets of paper to the size required – you need at least a one-inch margin around your negative. Mark the top side of the paper on each piece.
- Make up the salt solution, soak the paper in it for 2-3 minutes at room temperature or slightly above, gently brushing each side while under the solution to remove any air bubbles. Lift out, drain and hang to dry, putting down newspaper if necessary to catch the drips. Paper treated in this way can be used as soon as it has stopped dripping or dried and used weeks or months later.
- Tape the salted paper top side up to a board. Put the negative on top and mark the position of its corners lightly with pencil.
- In dim room lighting (away from sun and fluorescent lights), pour a few ml of silver nitrate into a small beaker or dish. Dip the tip of the brush in, and spread left to right across the paper making sure to cover the marked area. Keep the brush wet. Repeat using a series of top to bottom strokes. Try to get the surface of the paper evenly wet all over, but without any pools of solution. Don’t return any excess the solution to the bottle; add a little more to it to coat the next sheet. Leave horizontal until any liquid on the surface has been absorbed, then hang to dry in a dark place. Use gentle heat from a hair-dryer if you are in a hurry to get on.
- Put your negative on top of the dry prepared paper, matching its corners to your pencil marks. Unless you have a proper hinged-back printing frame, secure it to the paper down one edge using crystal clear transparent tape, making sure this does not go over any of the image area. Check you have the negative the correct way up. Put under the glass or in your printing frame.
- Typical exposure time needed is 10 minutes in bright sun, but you can remove it from the light and peel back the negative slightly to inspect the image. Take care not to move the negative – this is where a proper hinged-back printing frame is a great advantage. Expose until the highlight detail is slightly darker than you want it – the shadow areas will normally seem too dark, but will lose some density on processing. Paper negatives may take several hours, particularly in winter.
- In dim light, remove the paper from the printing frame and put into a tray of water – preferably use distilled or purified water for the first rinse. Use gloves and be careful how you dispose of this first rinse in particular as it will contain most of the silver nitrate. If possible it should be added to your normal waste fixer for recycling. Later rinses will have much lower silver content. Agitate for about a minute before pouring off, and repeat several times (using tap water for these later rinses.)

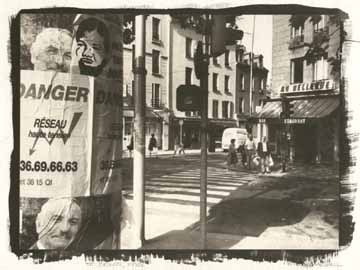
Paris XIIe, © Peter Marshall, 1988. Gold toned salt print.
- If your image is successful, you may wish to gold tone at this stage. Prints with developed edges are often trimmed to avoid waste of gold toner. You will find instructions for gold toning in books dealing with alternative photographic processes. As you may expect, it adds considerable expense. Gold toning was a later development not use by Talbot. I’d suggest you leave it until you have gained some experience in the process. Gold toning changes the image colour (not always for the better) and improves image stability.
- For prints that can be displayed and last, you should fix using hypo.If you are interested in following Talbot’s methods, you will find his instructions in various sources, including Beaumont Newhall’s ‘Photography: Essays and Images‘. Talbot does not appear to have washed his early prints either before or after ‘fixing’. For prints that will last longer, fix using a solution of 25 gm (1 ounce) of hypo crystals in 500ml of water with a pinch of soda (sodium carbonate) added. You can also use normal print fixer, diluted perhaps twice as much as usual, but this will alter image colour more and also remove more of the highlights. Fix for up to 5 minutes, keeping a careful watch on the highlights and remove the print and wash immediately if these start to disappear.
- Wash for around an hour in occasional changes of water and then hang to dry.
Resources
Various books have been written with methods for making salted paper prints in the more than one hundred and sixty years since they were introduced.
Henry H. Snelling‘s 1849 volume ‘The History And Practice Of The Art Of Photography‘ is subtitled ‘The Production Of Pictures Through The Agency Of Light’ and claims to contain ‘all the instructions necessary for the complete practice of the Daguerrean and Photogenic Art, both on metalic, plates and on paper’ (sic), and is well worth downloading from the web if you want to experiment further. Snelling more or less copies the details given by Talbot for making salted paper, but does add a number of further details.
The year after this was published saw the publication by Louis Desire Blanquart-Evrard of his work using albumen. This was an idea first proposed by an anonymous contributor to ‘The Athenaeum’ in May 1839 but Blanquart-Evrard was the first to put forward a practical method that contained the chlorides in the albumen. Albumen rapidly replaced salt printing as the normal photographic print because of its greater brilliance and depth of tone, and remained the dominant print medium until 1895 (finally going out of production in 1929.)
All paper prints in the first ten years of photography were salted paper prints, but after around 1855 it was probably mainly used for proofing. However, modern salted paper prints that I have made are a good match in terms of colour and tonal range to many matte prints from the 1850s (and later) identified in collections as ‘albumen prints’ and although it is possible to make matte albumen prints I suspect these are relatively scarce. If a print is matte, made before 1885, and does not have yellowed highlights it is highly probably that it is a salted paper print, whatever the curator’s label.
Many later photographic books also had instructions for salt printing and other early printing methods, but they were dropped out of most photographic textbooks by the 1930s. One of the best known from this period, ‘Photography, Theory and Practice‘ the English edition of ‘La Technique Photographique’ by L P Clerc, contains details of this and other by then obsolete processes such as albumen printing.
If you are interested in older processes and practices, you will find books such as the 1911 ‘Cassell’s Cyclopaedia of Photography‘ enthralling. I find it a useful source of information particularly for its many line drawings and learn something new every time I pick it up. However the older chemical nomenclature and weights and measures do make life a little trying at times, and there are some procedures suggested which bear no relation to common sense let alone health and safety procedures. Almost every page deserves a health warning. It lists salted paper under one of its alternative names, Plain Paper.
The best modern source of information on the whole area is ‘The Albumen & Salted Paper Book’ by James M Reilly mentioned above. First published in 1979 and long out of print it is now available in full on line – a generous gesture from the author. It really tells you everything you could wish to know.
The same year saw the publication of William Morgan’s ‘The Keepers of Light’, which remains a key text for those interested in older processes and is available secondhand. Since then a number of other books have also appeared which cover alternative processes in detail. Although some of these have excellent articles and illustrations on salt printing, there is nothing essential in them that is not available in the earlier works.
There are also a number of on-line resources, including the alternative processes mailing list and a number of fine web sites – too many for me to list or spend the time reviewing – just search on Google.
Materials for the processes can be hard to come by in but can be found online at specialist dealers, including Bostick & Sullivan and Photographers Formulary in the USA and Silverprint in the UK. Many articles on alternative processes have appeared over the years in various photographic magazines, and there have been independently produced magazines dedicated to alternative processes in both the UK (now defunct) and the USA.