Scanning Negs

I’ve just been reminded by a posting on the ‘Multipro’ list (for users of the now-discontinued Minolta Dimage Scan Multi Pro’) about some of the problems and solutions for scanning film negatives and transparencies. Although I’m using very little film now, I still have a few hundred thousand old images, and if I need to print any of these, I now turn to scanner rather than darkroom. Sometimes I have little choice; thanks to years of storage without any control of temperature, humidity or atmosphere, many now need considerable digital retouching to get an acceptable print. Of course in my early years, my processing might not always have been entirely archival, although some of the worst problems I have are with trade-processed materials.

Oil or Plastic? 

One technique sometimes used to improve scan quality is oil immersion of the film to be scanned, and apparently there is a feature in the current (Nov-Dec 2007) issue of Photo Techniques by Ctein in which he shows how to do this simply (but messily) using cheap mineral oil with the Minolta. Fortunately if you have a Multipro, you don’t need to get your fingers and film in a mess, as thanks to the work of Dutch photographer and filmmaker Erik de Goederen, you can use a Scanhancer, a simple plastic sheet that – at least in the tests I’ve seen – gives slightly better results than oil immersion.

If you use a different scanner, there is a page on the Scanhancer site that discusses other Minolta scanners, as well as those from Polaroid, Microtek, Canon and Nikon. Minolta themselves appeared to have learnt from the Scanhancer research, building in a similar device to their Minolta Dimage Scan Elite 5400 (and a slightly different, but no quite so effective method with the Mark II version) before their unfortunate absorbtion/demise at the hands of Sony.

Third-party Software 

Whatever scanner you own, its performance is likely to be limited by its software. I’ve owned half a dozen over the years, and for several of them crippled would be a more appropriate term. Getting good scans has meant using third-party software, and I’ve used (and reviewed) both SilverFast and Vuescan. Vuescan is the product of one man, Ed Hamrick, and has worked with every scanner I’ve owned and the pro version still offers unlimited free updates (I’ve been getting them for around ten years.) It’s good to know that when I have to buy a new scanner, Vuescan will almost certainly still work with it, while copies of SilverFast I’ve used were specific to a particular model. A single Vuescan licence also allows use by one person on up to 4 computers – and will work with several scanners on a computer.

Both programs can give good scans, though I’ve generally preferred the results from Vuescan, especially when scanning negs. For some jobs Silverfast was faster, and it often gives scans that need no adjustment in Photoshop, whereas those from Vuescan are always improved. But almost all the scans I make need considerable work on them, both to eliminate blemishes (infrared cleaning can do a little on most colour and chromogenic negs, but heavy use does destroy detail) but also to ‘dodge’ and ‘burn’ as I would in the darkroom.

I also scan at 16 bits per channel to enable me to manipulate the files in Photoshop without loss, usually reducing there to 8 bit per channel as few output devices will handle greater bit depth, and I’m generally rather short of storage space (even with more than a terabyte of hard disk in this computer I’m running out of space.)

Combining Vuescan with the ‘Scanhancer’ and ‘Multipro’ can give results that of comparable quality with those from high-end equipment (drum or those hugely expensive flatbeds) – at least from normal 35mm and 120 negatives. I suspect if you have very dense overexposed negatives the expensive gear may cope better.

At some point I hope to replace my old Epson flatbed by one of their more recent models such as the V750 Pro (or possibly whatever replaces this.) When I do it will be interesting to see whether Vuescan will get more out of it than the software supplied.


Exciting Times for Black and White

It must be well over 18 months since I last went into the darkroom to make a black and white print. Until recently it wasn’t something I’d ruled out, just that I hadn’t had a need to do so.

I’ve now printed several shows in black and white using ink jet, including some quite important events – such as my exhibition for the 2005 FotoArtFestival in Beilsko-Biala, Poland, where I was chosen as the photographer to represent the United Kingdom. It can’t have been too disastrous, as I’m back there again in around ten days time, although this time giving a presentation rather than as an exhibitor (Mitri Tabrizian is batting for us this time.)

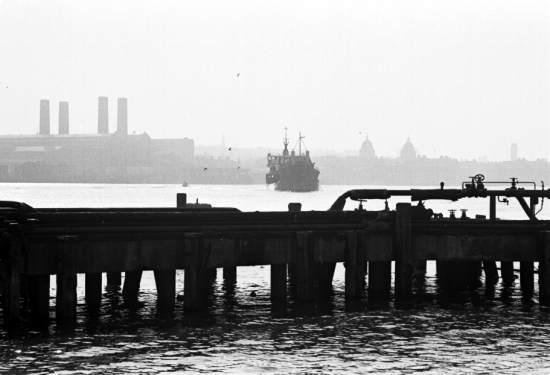
The work that I showed in Poland was from my London’s Industrial Heritage web site, taken in the late 1970’s and early 1980s, a kind of post-industrial landscape of London, largely based around the River Thames (but later extended to cover a wider area.)

Then I was printing using one of Jon Cone’s great Piezotone inksets, perhaps the first to really give great prints on fine-art matte papers, such as Hahnemuhle’s Photorag and German Etching. Few photographers really mastered printing on matte silver papers – George Krause is one of the few whose work has impressed me, although rather more have made fine matte prints using platinum – including the great masters of the medium, Frederick Evans and Dr Peter H Emerson. But using the Cone Piezography inksets (including the more recent K7 inks) makes it easy to acheive similar results.

A few years back, I had a platinum printer of some note come round to investigate making digital negatives for use in platinum printing. While he was here, I scanned one of his 4×5 negatives and made a Piezo print as well as the enlarged negative he wanted. It gave our meeting an uncomfortable end, as the print seemed to me considerably superior to the platinum he had previously made from an enlarge film negative.

Until around 18 months ago it was still clear that if you wanted really high quality glossy prints, the only way to produce them was in the darkroom. Then came the first generation of improved ‘fibre-base’ glossy inkjet materials, including Crane Museo Silver Rag, Innova F-Type FibaPrint and Hahnemuhle Fine Art Pearl, (and also their re-packaged equivalents, DaVinci Fibre Gloss Classic and Permajet Classic Fine Art Fibre Base Gloss.) These gave colour prints that more than matched those on the plastic RA4 colour papers, and black and whites that were hard to distinguish at least from run of the mill silver prints, although still perhaps a little lacking when compared to the best the current darkroom has to offer – and certainly inferior to the Holy Grail of the old formula Cadmium ridden and highly environmentally friendly Agfa Record Rapid of blessed memory.

Now we have a second generation of fibre-base inkjet papers, so far including Harmon’s Gloss FB Al, Hahnemuhle’s Fine Art Baryt and, perhaps most interesting, the first such paper from an inkjet printer manufacturer, Epson’s Exhibition Fiber, available from next month. So far all I’ve been able to do is read the reviews, such as this on Luminous Light.

I’m already thinking what I can do with my darkroom. At the moment the most likely use is storage for all those Terabyte disk arrays I’m going to need for the incredible amount of digital files I’m currently shooting on the D200 for ‘My London Diary.’

Weddings and Compacts

I’m not a wedding photographer. I’ve only officially photographed three weddings in over 30 years as a photographer, one of which was a couple of years back when my own younger son got hitched, and I could hardly refuse his request. It was a long day, and the pictures cover well over 12 hours, and show a certain deterioration towards the end which could be slightly alcohol-related. There are just a few of them on My London Diary that give some of the flavour of the day, with some text that of course starts with me quoting Brodovitch’s “so you want to be a wedding photographer!”.

The other two occasions each has a little story, but I’ll keep those for another time. Of course I’ve been to other weddings, but I make a point never to take a ‘real’ camera and to stay well out of the way of the professionals.

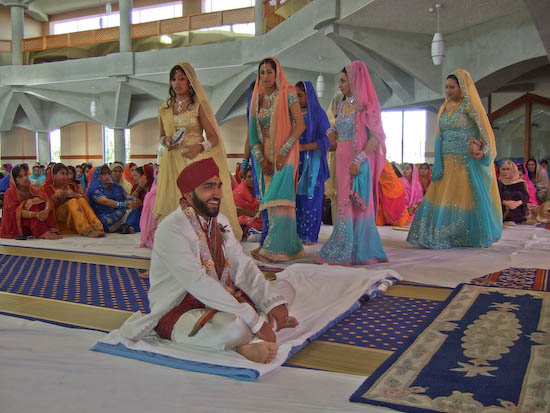
So on Saturday, a guest, I turned up to the Gurdwara with just a little Fuji F31fd digital in my pocket, as despite having been told it would be fine to take plenty of photographs, I was really intending not to take much. But it was my first experience of a Sikh wedding, and I soon found myself caught up in the colour and human interest of the event, and shooting at least as much as I would have done with my Nikon.

Given the minute size of the sensor, the results are surprisingly good; perhaps the main failing isn’t noise or sharpness, but the colour quality. Hard to pin down, but it just somehow lacks the smoothness of colour and tone that the D200 provides, and at 6Mp the files are of course a little smaller.

Light was a problem, although the area where the main ceremony was held has a lot of natural light and the team of photographers covering the event had added a couple of movie lights, they and I were shooting with flash as well. I’m sure the results they got with their SB800 units – my normal choice of flash – were rather better in that respect than the tiny built in flash on the Fuji, although it did a decent job (with of course a considerable amount of red-eye.)

One of the reasons for choosing this model was its relatively good performance in lowish light, and a second its relatively short shutter lag, and both were useful. What I still hate about it is the lack of a viewfinder. Holding a camera out in front so you can see the viewing screen is just not a good way to work. It is much trickier to frame, and the camera is much harder to hold steady. So quite a few shots were not sharp, many more than I would expect with the Nikon under similar conditions. The vibration reduction (VR) in the Nikon 18-200 would also have come in useful.

Push-button zooming is also a little of a disaster – very difficult to control the rocker switch accurately and much slower to be precise than the manual ring on an SLR lens. The 8-24mm zoom is roughly equivalent to a 24-72mm on the DX Nikons (35-105 on ‘FX’) and there were times when I would really have liked a wider view.

All cameras are compromises, and given the size and low cost of the F31fd (mine as £133) it proved a remarkably effective tool. A final compromise for me is that the camera has no raw mode, and I was shooting using the highest quality jpeg it provides. The 2Gb XD Picture Card did add another £25 to the cost, but does hold around 680 images – enough to keep me happy most days – though of course I also needed to spend another £13 on a spare compatible battery.

The images straight out of the camera seemed a little harsh, with some empty highlights and blocked shadows, as well as some small colour temperature problems in some images. I could have tried sorting these out in Photoshop, but instead imported the images using Lightroom. (Incidentally this is now at version 1.2, another free upgrade for registered users.)

I don’t quite understand how, but this appeared to let me get something extra out of many of them, although not as much as with RAW files. I was also surprised to find that those files that I looked at later in Photoshop didn’t have any of the ‘comb’ effect – gaps in the histogram – which I would have expected from working on them. I also converted the files to Adobe RGB which I normally use with the Nikon.

Looking at the files in detail it is clear that one of the main problems with my use of the camera is camera shake at speeds where I would normally have no problem with hand holding. Its a problem that I think would not be there if the camera had a viewfinder so it could be used held to the eye. I’ve not had the camera long, and I’m still struggling with the camera manual, which goes out of its way to be friendly while giving you as little actual information as possible. It has as what is called a ‘picture stabilisation’ mode, which appears to be is a simple auto program that selects higher ISO and shutter speeds than normal – but has been misleadingly named to suggest the camera incorporates image stabilisation – which it does not.

What it does have is excellent performance at high ISO. Although the quality is best at the slowest ratings of ISO100 and 200, many of the images at ISO800 are perfectly usable. At ISO1600 it is still remarkably good. Without the use of specialised noise-reduction software the results are in the same region as those from the Nikon D200 at the same speed. Things do fall apart rather at ISO3200, but it looks as if we are going to have to save up for the Nikon D3 if we really want to work at that speed.

You can see more of the pictures from Saturday’s wedding on My London Diary. I tried hard to capture all the key events in the ceremony without being in the way of those doing the job officially. I’m not sure if I can live with the Fuji. I’m thinking of trying to use it at the wide-angle setting either completely without a viewfinder, or possibly by adding a sports or accessory viewfinder on to the top of the camera.

CS2 going cheap

One of life’s truisms is that if something sounds too good to be true it probably is. So when I heard from Tony Sleep that genuine shrink-wrapped copies of Photoshop CS2 (not the latest edition, which is CS3) were going cheap, I was suspicious. But I did take a look, and they looked absolutely kosher, and some were from sellers with excellent feedback.

The story was that they were old stock that was being sold off cheap for clearance. Tony had bought a copy, and everything about it looked genuine. Later he notices that although he had installed it and found it worked fine, the activation process hadn’t set him up an account with Adobe. Another buyer then informed him that having had the same problem, he had contacted Adobe, who had told him the serial number he had was not genuine. Tony also contacted them and was told the same.

Being Tony, he didn’t leave things there, but took it up with Adobe, and also started doing a little research. The printed material is of such high quality he feels sure it was produced from genuine Adobe files, and Adobe appear to have known about the forgeries for several months, since May or June of this year. Ebay has a procedure called VeRO, (Verified RightsOwner Program) which enables companies such as Adobe to put a stop to such things more or less immediately, but have failed to take action. I checked again today and found over 20 copies still on offer, all presumably counterfeit.

You can read more about the scam and Adobe’s failure to act on Tony‘s blog. Photoshop must be one of the most widely pirated programs around, and whenever I mention in a group of photographers that I’m still using Photoshop 7, I get offers of CDs containing pirated versions of CS2 or CS3. Most of these were either downloaded free from ‘warez’ sites or bought for a few pounds – sometimes from eBay – while the current ‘genuine’ fakes seem to go at auction for around £120.

I didn’t upgrade from PS7 mainly because it seems to do all I want, and also because Adobe had added an ‘activation’ routine to the software which not only meant you had to contact them to keep the software running (which is acceptable if extremely annoying when your computer has a hard disk failure or the operating system needs re-installing) but also wrote to areas of the hard disk it had no business to access.

Like many photographers I hope that someone is going to come up with a viable alternative to Photoshop for various reasons (and it would be nice if it ran on Linux as well.) One project that looks promising is Pixel, from Pavel Kanzelberger in Slovakia, though there are still some vital aspects missing.

Many of us need software that understands colour management and that can also convert to and work in CMYK when we really have to, as well as working with 16 bit files and running useful Photoshop plugins offering noise reduction, smart sharpening, lens distortion correction and so much more. In many ways Photoshop is just a framework for other software, and there are huge areas of it I never use directly. I certainly don’t need the whole ‘Creative Suite’ that Adobe is trying to push at us.

Peter Marshall

Not A1 at Lloyds

When the idea of Open House days first came up I thought it was a great one, and in the first couple of years I went into quite a few places otherwise inaccessible to the public, and even took a few pictures, although photography wasn’t always allowed. Now it has perhaps become too popular, and except for those locations where you need to book in advance (and where places tend to fill very rapidly) there are often extremely large queues.

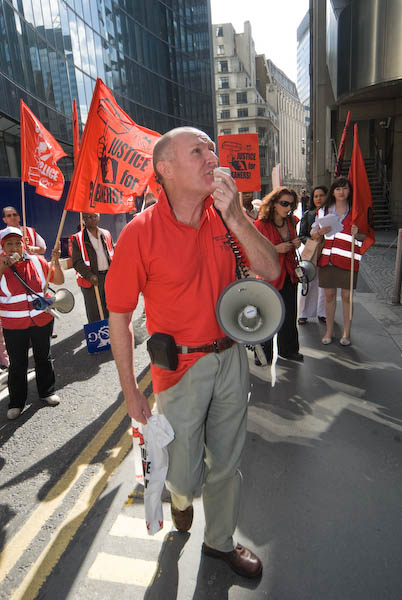
One of the longest queues this year was at the Lloyd’s building, and the London Citizen Workers took advantage of the event to hold a demonstration. Cleaners at Lloyd’s – whose members are among the wealthiest people in the country – are some of the lowest paid in the capital, and the contract firm that employs them apparently provides no sickness pay or other benefits. They have so far resisted the campaign by the LCWA for a ‘London living wage’ for cleaners, which demands £7.20 an hour, along with entitlement to sick pay, holidays and access to a recognized trade union.

It was a small but vociferous demonstration, and some of those queuing expressed surprise at the poor treatment of the people who keep the Lloyd’s building clean. The Living Wage campaign reveals the poor treatment of essential workers, who are trapped in a ‘working poverty gap.’

Technically it was an interesting but difficult job. More film and megabytes have been used on the Lloyd’s building than any other modern building in London, and its shining silver surfaces have a definite appeal to photographers. The red banners and tabards of the demonstrators added some exciting colour, and the strong sunlight coming down the street some powerful lighting effects. But although visually stimulating, it was murder to photograph, with contrast hitting the extremes.

Picket at Lloyd's London

At least with digital you get a clear view of the problems you are facing, although in this case they were not entirely soluble. Although flash fill can bring up the foreground, it could not deal with the lower floors of the building which were in deep shade while the upper levels were in bright sun. A few years back I would have shot this kind of thing on black and white without fill (as a colleague was still doing with his Leica and doubtless getting great pictures) and probably cursed on location my inability to take wider images, and back in the darkroom cursed the empty shadows and dense highlights.

More pictures on ‘My London Diary‘.

Peter Marshall

Not Another Drop

Saturday I photographed a demonstration at which the police could not have been more helpful. Perhaps hardly surprising, since they were a part of the ‘Not Another Drop‘ campaign started in 2001 by the Community Safety Partnership uniting the Met and Brent Council. The annual Peace March – this was the fourth – was founded by Patsy Hopwood, whose student son, Kavian Francis-Hopwood was shot dead on the Stonebridge Estate in 2003 – still an unsolved crime.

Supporting the march were several local church groups (including a Brazilian congregation from the area) and families of several of the many young people who have met similar violent deaths in Brent in recent years, many of whom were shown on posters carried in the march. Although obviously the aims of the march can only be applauded, it was perhaps disappointing not to see greater support from the various communities in the area, with only around 250 gathering for the start of the march at Stonebridge, although more were expected for the rally at the end of the event in South Kilburn.

One of the trickier parts of the event for the half-dozen or so photographers present was the release of white doves shortly before the march started. I’m still not quite sure whether to rely on my reflexes or the 5 fps mode of the D200 to try to catch the peak moment. What I actually did was to try to catch the moment and then hold my finger down to get the next few frames at 5 fps. In fact the second exposure turned out to be the best, but I was left wishing I had one slightly earlier – and perhaps slightly later. It’s one of the few situations where I’d really like to have the 9fps that Nikon promise us for the D3 due later this year.

More pictures from the event on My London Diary.

Keeping Clean

Not personal hygiene, but camera hygiene. Photographers in general haven’t a great reputation for the first, and probably the more arty you aspire the longer and more tangled your beard, except, possibly, if you are a woman. And photojournalists can often find themselves in places where baths and showers are in short supply. Lee Miller and David Scherman even had to borrow Hitler’s in Munich

Digital seems to bring more problems in keeping cameras clean. Not just sensors, but also lenses seem to me to be more affected by dust, fingermarks and more. Perhaps its because we are getting used to a cleaner result with digital and there is no grain to disguise defects. With film we pick up the crap after the event (I’ve just spent what seems like hours cleaning a few scans) but with digital its what gets on when we take them that matters.

With lenses the solution is easy. I didn’t believe it when I went on an internet photo radio and the presenter spent half the programme plugging the ‘Lens Pen’ but it is really a rather neat solution, although they do fall to pieces after a few months of use they are still worth the money. Just a shame that 7 day shop no longer seem to stock them, but even at the RRP of £8.99 they are worth the money. Fast, easy to use, efficient. Who could ask for anything more?

Cleaning sensors is a little trickier. Start by buying a really good (i.e. big) ‘Hurricane‘, ‘Rocket‘ or similar air blower – a big black rubber bulb with a valve at one end and a red plastic tube with a small hole. I got mine from Jessops for a fiver, though they no longer seem to list them, but other photo dealers will have them. These last for around a year or two if you are lucky before the rubber will start to crumble and give dust.

Air blowers are safer than aerosols on your sensor, better for the environment – even the so-called ‘green’ aerosols damage it severely and don’t run out when you need them. They also seem to be as effective. I’ve got into the habit of using mine every day before I go out, it takes half a minute to remove the lens, blow out the mirror box a few times, raise the mirror and give the sensor a few thorough blasts, then replace the lens and put the mirror down (don’t leave it up, as on some cameras this runs the battery down.)

Blowing doesn’t remove stuck dirt, but this daily ritual has significantly cut down the amount of proper cleaning I’ve had to do. I fire a test shot – my fridge door exposed out of focus with the lens at the smallest aperture and wide-angle and moving the camera to prevent any of the dirt from the door making an image. Then I zoom in to the exposed image and check for any spots.

Stage 2 cleaning involves the use of a brush. I bought a genuine and expensive ‘Sensor Brush’ but I’m told any suitably sized brush will do, so long as you clean it very carefully to remove any size before initial use. Petteri Sulonen has a great feature that tells you how to choose a brush, clean it and test it, along with many other tips on sensor cleaning.

Keep the brush in a suitable container that keeps it pristine, such as a sealed box or plastic bag. It will need washing occasionally too. To use it requires a little common sense and care. The brush shifts dirt when you brush the sensor, but you also want it to pick dirt up. You also need to work on a clean surface in a reasonably dust-free room – I find my kitchen a suitable place, and avoid wearing clothes that produce fluff or dust. Always start by using the blower as above before turning to the brush.

Sulonen recommends striking the brush against the flat edge of a kitchen knife to clean it before use. I use half a dozen puffs from the blower brush to blow it out (away from the camera of course.) Then a single pass of the brush to lift dirt, clean the brush, another pass… Repeat this perhaps half a dozen times, then put the mirror down, replace the lens and take another shot to check the image is clean.

If there is still dirt on the sensor after repeating the brushing process a few times, then you need to consider wet cleaning. Roughly following the ‘Copperhill‘ method, I made a support for my home-made swabs from the handle of an old toothbrush and an old credit-card style pass. I cut a slot in the end of the handle to fit the card, cut a strip from the card just slightly less wide than my sensor, rounded its corners slightly, carefully cleaned the edges and pushed it into the handle.

Working again under clean conditions, I fold a clean Pec-Pad lint-free non-abrasive tissue around the card to form a swab (put the end half way across, fold the bottom up, then fold left and right sides over, secure with sticky tape – see photo.) Add one drop (or at most 2)  of superfine clean Eclipse methanol, place the tip of the swab at one edge of the sensor, pushing just hard enough to flex the card very slightly and thus ensure good contact. Wipe the sensor from there to the other edge slowly and firmly with the swab leaning slightly forward, pick it up and go back in the opposite direction – you will be using the other side of the swab.  Discard the swab, leave the camera (sensor pointing down so as not to collect dust) for around 30s to ensure any residual methanol has evaporated,  refit the lens and test as before. If there are still dust spots, repeat. The swab and methanol cost around 10p, rather cheaper and I think at least as effective as any of the commercial products I’ve tried.

A single swabbing won’t always remove all dirt – either with a homemade swab or commercial ones. Occasionally I’ve had to use 3 or 4 before I was satisfied. At 10p a time it isn’t a problem, but using commercial swabs at £4 or so a time, costs soon mount.

Of course even that is cheap compared to taking your camera to a repairer for cleaning (and costs there can mount if the dust is hard to clear.) The other good reason for doing it yourself is the great time saving – no travel and no waiting until a technician is available – or leaving your camera to collect later.

Disclaimer

Although I’ve yet to hear of anyone having problems from using this method, it is always possible, and you follow any of these suggestions entirely at your own risk.

Taming the Swirl

Since I’ve had the Nikon 10.5mm semi-fisheye I’ve come to regard it as an essential lens. It isn’t something I want to use every day on every subject, but when you find a subject that needs it, it is generally the only thing that will do.

One thing I love is the ability to shoot in crowds, where you have essentially zero working distance – if you try and draw back to get your subject in frame, other people just fill up the gap. With the ‘fish’ you can avoid leaving gaps and take your pictures. But there is a down side, and it is what happens close to the frame edges, where people (or anything else) gets curiously curved towards the edge and stretched out vertically. Sometimes you get a face that looks more like a caricature drawn on a kind of crescent moon.

Corrected Image
Image has been corrected using Fisheye Hemi.

It’s all a matter of perspective, and working on digital makes it a simple matter to alter the perspective projection; many images are considerably improved by re-mapping them using the free Panorama tools plugin for Photoshop. Its perhaps surprising that changing to the normal rectilinear mode seldom gives usable results, at least not without excessing cropping. It just isn’t a viable method for very wide angles of view, as it greatly stretches anything near the edges of the picture.

Usually the best results are made using the ‘QTVR-Panoramic’ setting, although the ‘PS-Sphere’ can also be interesting. Both do however involve a noticeable loss of the image.

You can see some examples and comments in my Getting More from the Nikkor 10.5 Fisheye
and also Fisheye Hemi and other plugins. The others include the very versatile PTLens, an essential tool for anyone shooting digital, particularly if you ever photograph subjects with straight lines.

The two images here were both made using the appropriate Fisheye Hemi plugin to remap the perspective. I also used Lightroom to remove chromatic aberration and remove the slight lightening at the edges of the frame – a kind of negative vignetting.

Corrected using Fisheye Hemi
Another corrected fisheye image

I don’t know what Reuters would make of this; it almost certainly would be in breach of the actual rules they set down. To me, this kind of manipulation is an important part in making my pictures more accurately represent the situation I was photographing. It would be nice if lens-makers could produce lenses that worked more like the way that we see things, but I think physically impossible. With digital we can use software to get closer.

Peter Marshall

End Colour Fringing

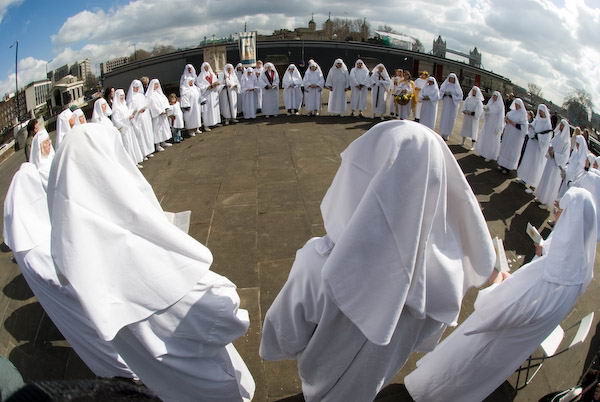
The Nikon digital 10.5mm semi-fisheye is one of my favourite lenses, although it needs to be used sparingly. I wrote about it at some length for About.com shortly after getting it, with various suggestions for using and altering the images it gives. Since then I’ve used it to create several images I feel proud of, subjects that just fitted the effect it gives, like this circle of druids at the spring equinox in London:

Druids in London (C) 2007, Peter Marshall
Spring Equinox at Tower Hill, 2007

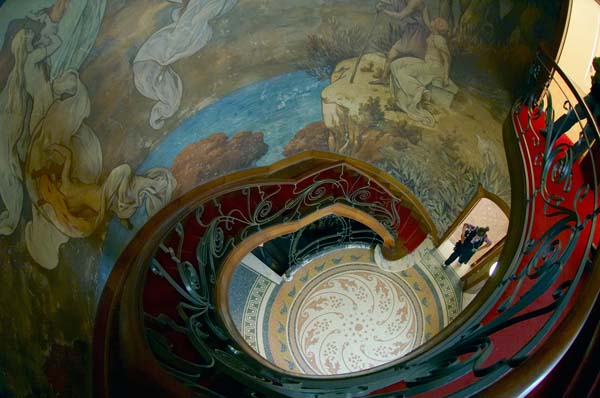
Anyone reading this in Hungary who saw the recent ‘Europe of Culture – the culture of urbanity‘ show this year will have seen this picture I took at Contretype in Brussels, where the circular stairway of the Hotel Hannon provided another ideal subject.

Hotel Hannon (C) 2005, Peter Marshall

But the lens does have one severe problem, chromatic aberration, which needs to be corrected at least for good large prints. For the Hungary show, I spent ages working on the file, removing some of the more noticeable colour fringing using Photoshop.

But of course there are easier ways, and one of the best I’ve found is in Lightroom, which I now use for converting my RAW digital files. (People tell me the Nikon software does a good job, but even several years and 2 camera bodies later I still can’t bring myself to pay for the software that Nikon really should have supplied free with the cameras.) It isn’t just useful for the 10.5 Nikkor, but almost all the images I take when I want to make critical large prints, as nearly all zoom lenses show some chromatic aberration at most focal lengths (the Nikon 18-200, for example, is fine at 24mm, but away from this needs a little help.)

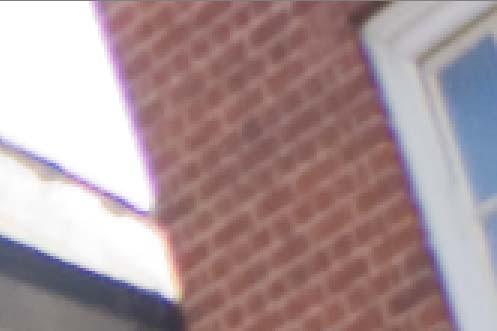
If there is anyone using Lightroom who has yet to find this, or anyone still wondering if Lightroom is worth the money, in the Development mode there is a panel headed ‘Lens Corrections‘ with two and a half sections. The first part has two sliders to control chromatic aberration, one for Red/Cyan and the other for Blue/Yellow. Here is a small section of an image taken by the 10.5mm, from close to a corner and at three times actual size to show the effect exagerated.

3:1 section of original
Before any correction – image at 3 times actual size

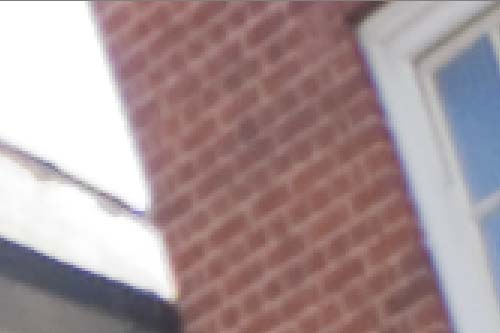
And here it is after adding -46 Red/Cyan and +32 Blue/Yellow

After Chromatic removal

There is still some colour fringing, although it is a lot improved. Below the two sliders is a ‘Defringe’ setting that controls the removal of blue fringing found in many digital images. If set to ‘All edges’ it finishes the job, giving an almost perfect result (and with a little tweaking of the sliders I could probably improve it slightly.) It actually makes the settings for chromatic aberration easier to determine if you set the ‘defringing’ first.

Image defringed

Lightroom will also do a little more for these images. Most pictures taken with the 10.5mm show some vignetting, usually giving images that are lighter at the corners. The lower half of the ‘Lens Corrections’ panel can deal with this, often looking best with values around -35 for amount and 21 for midpoint.

I spent some time playing with this today as I used the semi-fisheye for some pictures at Notting Hill Carnival over the weekend, which I’ll write about a little more later. Again it let me take pictures that could not have been taken any other way.

Peter Marshall

Don’t Lose Your Pictures

A few days ago I heard the very sad story of a photographer whose home was robbed in the night and his camera gear stolen. With it also went the card containing the pictures from the job he had shot the previous day. Of course I feel for the guy, but I do think he had failed in a rather basic way so far as the images were concerned.

When I shot film (and on the few occasions I still do) every time I take a 35mm cassette out of the camera the film either gets rewound completely inside, or I tear off the end so there is no danger of loading it again. Random double exposures might of course interest some arty types, but seldom make good documentary or photojournalism.

With digital, you can’t get double exposures in this way, but it is all too easy to put the same card in the camera again, format it and shoot over your existing work. It can happen even if you only own a single card, but it gets much too easy to get mixed up once you have a handful. (Formatting doesn’t remove your files, but allows them to be written over when you shoot more pictures.)

So if you are shooting digital, you need to sort out some simple rules about looking after your work. Working practices that make it pretty difficult to lose your pictures.

So here’s my advice and what I do – and I hope it will be a useful guide.

Digital Card Security

  1. Keep cards ready for use and those you have used in different places.
    (Cards ready for use are in my camera bag. Used cards in a secure pocket of my trousers – with my credit card etc. I keep them in their plastic cases in both cases to stop the contacts getting dirty.)
  2. At the end of any job, remove the card from the camera and put it in a secure place.
    (Mine goes in that secure pocket; if I want to take more pictures I put another card in the camera. )
  3. Immediately you get back to base, use your computer to transfer the contents of your cards to two separate locations.
    (I do mean immediately – I put the computer on before I put the kettle on or open a bottle and have Lightroom set up to automatically import the files and make a backup on another hard disk. When travelling I transfer to one location on my notebook and pray, or take a portable hard disk to make the second copy. Doing it immediately also stops me throwing the cards with my trousers into the washing machine, although I’ve heard of several people who have done this and still been able to read the card once it was dry.)
  4. Install RescuePRO/Photorecovery or similar software on your computers.
    (If you get a problem with a card, take it out of the camera immediately. RescuePRO will almost certainly be able to get your files back – except for any that were not written when the error occurred.)

RescuePRO came free with my recent Sandisk cards – which cost less than the software itself. It seems to work fine on other makes of cards and USB drives. So far I’ve only had to use it on other people’s cards, but one day I’m sure to need it.

Longer Term Storage

As well as considering your working practice while shooting and immediately after, you also need to think about the longer term storage of your images. Making two copies immediately is a good start for this. But shortly I’ll put down some of my thoughts on this vital topic. Of course I wrote about it on ‘About Photography‘ in 2003, but although I think I got it more or less right, I might want to alter a few details.